How to Spot Fake Electronic Component, The Dilemma We All Face
If you run a small‑to‑medium volume electronics assembly line (or you entrust a small‑to‑medium volume electronics assembly factory to provide a one‑stop service for your low‑volume products), especially in a low‑volume, high‑mix production model, you have likely encountered the following dilemma:
“I need 500 pieces of a specific IC by next week. The price from my usual distributor is high, and lead time is 12 weeks. Another supplier offers half the price with immediate stock. But are the components real?”
This is not a theoretical concern. Over years of working with SMT factories and unauthorized electronic component distributors, I have seen many instances where counterfeit parts triggered intermittent on-site malfunctions, overnight rework and even full batch scrappage. This is especially true for low-volume, high-value industrial products that cannot be reworked; losses caused by a single counterfeit component can sometimes be catastrophic.
150 Sets, One Little Counterfeit
Take a recent case we encountered as an example. We received an order for 150 sets finished PCB and box building assemblies from an overseas client and successfully completed PCBA production as well as procurement of all accessories such as enclosures. To mitigate risks, the client requested us to first ship 50 sets of PCBA for full on-site assembly, testing and validation at their local facility. This practice clearly shows the client has extensive experience in product development, which indeed proves to be the case.
Just as the customer was about to receive the first 50 sets of PCBA, a problem arose. Our long-term supplier informed us that one of the component FT232RL (which is for USB to UART bridge IC) assembled on that PCBA was a counterfeit! Oh my – what to do? The customer desperately needed those 50 sets of PCBA for programming and validation!

Regardless, we immediately notified the customer to stop programming and enclosure assembly. We replaced that component from the 100 sets of PCBA we still had on hand, and resent 50 sets to the customer. The 50 sets already at the customer’s site were sent back to our factory for rework and replacement.
I won’t go into too many details of the story, but let’s take a look at this component.
Spoiler Alert: The "Nice" One Was the Fake
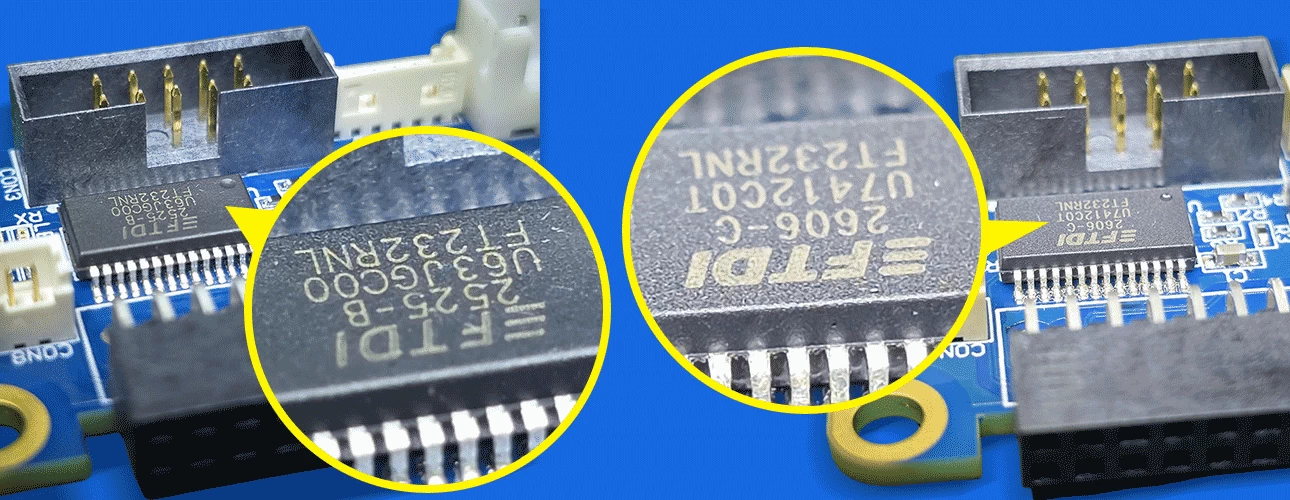
The following two images come from PCBA boards in our actual production, both populated with the FT232RL integrated circuit. We have labeled them as FT232RL (IC A) and FT232RL (IC B). One of them is a genuine FT232RL, the other is a counterfeit.
However, unless you are the design and manufacturing engineer of this chip, or a sales engineer for this chip, or an electronics engineer who has long used this chip for product development, it is very difficult for an ordinary person to tell which IC is genuine and which is counterfeit.


We have collected as much information as possible through the table below for comparison:
Comparison Item
FT232RL-IC A
FT232RL-IC B
Appearance
No obvious signs of rework or refurbishment
Decent, standard
Pins
Bright, with evenly distributed solder
Normal brightness
Marking
Fine font, deep engraved indentation, somewhat unnatural
No obvious deep engraving, natural and clear
Date Code
2525-B
2606-C
Even with the information above, it is still difficult to tell which one is the counterfeit, because none of the entries clearly expose a red flag!
The real counterfeit is IC A. Its marking style deliberately deepens the engraving to make it look sharper, with deeper indentations. In contrast, IC B’s marking appears natural and smooth, as if flowing effortlessly.
In a high‑mix environment, you cannot afford to test every single reel with million‑dollar lab equipment. But you can build a practical system to ensure the authenticity of purchased components without slowing down your production
This article explains exactly how — with real‑world examples, trade‑offs between price/lead time/risk, and a simple step‑by‑step verification workflow for small EMS services provider.
1. Why Low‑Volume, High‑Mix Factories Are Prime Targets for Counterfeit ICs
But low‑volume (LV) / high‑mix (HM) factories operate very differently:
- Many part numbers → you cannot afford to keep huge safety stock for every SKU.
- Small quantities (50–5000 pcs) → big distributors often ignore small orders or charge high handling fees.
- Short lead times → you are forced to buy from independent brokers or “marketplace” sellers.
- Price pressure → customers want fast and cheap. This pushes purchasers toward “too good to be true” deals.
Counterfeiters know this perfectly. They target LV/HM SMT houses with:
- Remarked ICs (lower grade or slower speed printed as higher grade)
- Recycled components (pulled from scrap PCBs, re‑tinned, and re‑packaged)
- Completely fake dies (different silicon, sometimes not even functional)
IC “A” in our example belongs to the first category: visually almost identical to the genuine one, but failing under thermal stress or at higher frequency.
2. Understanding the Risk: Price, Lead Time, and Authenticity Trade‑off
Before building a verification system, you must accept a simple truth:
If a deal looks too good to be true in both price AND lead time — it probably is.
Here is a realistic risk table for a typical LV/HM EMS factory buying an industrial IC (e.g., a power management IC or microcontroller):
Channel
Price (vs market)
Lead time
Authenticity risk
Best for
Franchised distributor (Mouser/Digi‑Key)
100% baseline
8–16 weeks
Very low
Prototypes, critical lots
Authorized regional partner
85–95%
4–8 weeks
Low
Production, repeat orders
Large independent broker (tested)
50–80%
1–2 weeks
Medium
Low‑risk, non‑safety parts
Small online broker / marketplace
30–60%
Same day – 1 week
High
Emergency stop‑gap ONLY
“Amazing deal” unknown source
<30%
Immediate
Extremely high
Avoid for active components
In the case of IC “B” (genuine), the factory paid a reasonable price through a well‑checked broker with known test procedures. IC “A” came from a one‑time emergency purchase at 40% lower price — and caused 15% field returns.
The lesson is not to always buy the most expensive option. The lesson is to match the verification effort to the risk level.
3. A Practical 4‑Step Workflow to Ensure Component Authenticity
You do not need an X‑ray machine or a decapsulation lab for day‑to‑day incoming inspection. Instead, build a tiered verification workflow based on part criticality.
Step 1 — Supplier control before purchase (the most important step)
Authenticity starts before the PO is sent.
For every non‑franchised purchase, ask the supplier:
Source traceability
Which original distributor or authorized re seller did you buy this from? Can you provide their invoice?
Inspection before shipping
Do you perform visual inspection, X‑ray, or electrical tests? Send report.
Return policy for fakes
If we find counterfeit evidence, do you refund full cost plus rework fee and 100% compensate the lost accordingly?
Reliable independent brokers will answer clearly. Dodgy ones will say “trust us” or ignore the question.
Also check market price vs quoted price. For a given IC (e.g., a popular STM32 or TI power IC), if the market spot price is 5.00 and a supplier offers 5.00 and a supplier offers 2.20 with immediate stock — stop. That is not a bargain. That is a counterfeit indicator.
Step 2 — Visual inspection (performed on every incoming batch)
Even without expensive tools, a stereomicroscope (20–40x) reveals many fakes.
Compare IC “A” (fake) vs IC “B” (genuine) visually:
Feature
IC “A” (fake)
IC “B” (genuine)
Top marking laser quality
Light, but much clear
Just natural and clear
Pin surface finish
Too shiny, not re‑tinned
Matte, uniform
Edge of mold compound
Normal and regular
Smooth, precise
Date code logic
Regular
Just normal
Dimple / orientation mark
Clear and regular
Clear, centered

Action: For each batch, take 5–10 samples and compare against a known genuine part (or high‑resolution photos from the datasheet). If two of these signs appear — quarantine the lot.
Step 3 — Electrical and thermal quick tests (for medium‑critical parts)
For parts costing >$1–2 each or used in power/signal path, add simple bench tests:
- Continuity test on all pins (detects dead or disconnected dies).
- Input current / standby current (fake parts often draw higher or lower than spec).
- Basic functional test under nominal and 85% supply voltage.
- Thermal check after 5 min operation (fake ICs often run hotter due to wrong die).
In our example, IC “A” passed visual test at a glance but failed thermal test: it ran 12°C hotter than genuine IC “B” under same load — a clear red flag.
You do not need to test every resistor or simple transistor. But for active ICs (regulators, MCUs, op‑amps, drivers), this 10‑minute check saves weeks of debugging later.
Step 4 — Sample decapsulation or X‑ray (for high‑risk or safety‑related parts)
For the most critical parts (medical, automotive, or expensive ICs >$20), occasionally send samples to a third‑party lab for:
- Decapsulation + die inspection (checks if the die matches the genuine layout).
- X‑ray inspection (detects different bond wire patterns or missing die).
This costs $50–200 per sample. In a low‑volume environment, you apply this only to:
- New suppliers (first 3 orders)
- Parts with suspicious visual or electrical signs
- Lots where field failure would cost >$5000
4. How to Build a Simple “Authenticity Score” for Purchasing Decisions
Create a lightweight risk score for each non‑franchised purchase. No software needed — Excel is enough.
Example scoring (1–3 points each):
Criteria
3 points (low risk)
2 points
1 point (high risk)
Supplier history
>5 good orders
2–5 orders
First time
Price vs. market avg
>80%
50–80%
<50%
Lead time available
>8 weeks
2–8 weeks
<2 weeks
Test report provided
Full electrical + visual
Visual only
None
Return policy for fakes
Full + rework
Refund only
No clear policy
Risk score = sum of points.
- 13–15 points → green (buy with standard visual inspection).
- 9–12 points → yellow (add electrical quick test).
- <9 points → red (do not buy OR sample test decapsulation before full order).
In a small factory, this score can be calculated in 2 minutes per RFQ. It forces purchasers to think beyond price.
5. Real Example: IC “A” vs IC “B” in a High‑Mix Scenario
A recent real case from an industrial control SMT line:
- Part needed: F1232BNL (interface IC), 800 pcs.
- Franchised lead time: 14 weeks.
- Customer required delivery: 5 weeks.
Supplier X offered “A” (fake) → 40% lower price, immediate stock, but could not provide source traceability.
Supplier Y offered “B” (genuine) → market price, 2‑week lead time, with previous order history and basic test photos.
The purchasing manager, under schedule pressure, almost chose “A”. After internal risk review (score: 7 points → red), they paid 30% more for “B” (score: 12 points → yellow with electrical test)
Result:
- IC “B” passed all tests and the final product performed without issue.
- Another factory using IC “A” from same cheap source experienced 18% field returns due to communication errors at high temperature.
The extra 240 paid for“B”avoided roughly 240 paid for“B”avoided roughly 7000 in rework, shipping, and reputation damage.
6. What If You Already Have a Suspicious Batch?
If you suspect a batch of ICs may be counterfeit like example “A”:
- Stop production immediately for that part number.
- Quarantine the remaining stock.
- Compare with known genuine samples (visual + thermal + electrical).
- Contact the supplier with clear evidence (photos, measurements). Reliable ones will replace or refund.
- If the supplier disappears or refuses, report the part to industry databases like ERAI or GIDEP.
Do not “just use it” because the customer is waiting. A fake IC will fail — often in the field, not in your test bench.
7. Summary: Build Authenticity Into Your System, Not Just Your Inspection
Ensuring component authenticity in a low‑volume, high‑mix factory is not about buying the most expensive parts — it is about creating a process that matches risk, cost, and verification effort
Action
Frequency
Cost
Impact
Supplier source check
Every batch
5 min
Prevents 80% of fakes
Visual inspection
Every non‑franchised PO
2 min/batch
Catches 50% of remaining fakes
Electrical quick test
Medium‑critical parts
5 min10 min/part
Catches 30% more
Lab decapsulation
High‑risk / new supplier
$50–200
Final verification
And remember the “A vs B” lesson: cheap ICs that look perfect on top can still be fake. Do not trust your eyes alone. Trust your process.
By combining smart supplier selection, simple bench tests, and risk scoring, even a small SMT factory can ensure the authenticity of purchased components without slowing down the high‑mix workflow.
Need a Checklist?
Download our free “Incoming Component Authenticity Checklist for Low‑Volume SMT” (Excel template with scoring and visual inspection guide) — contact our team or leave a comment below.
Have you encountered fake ICs in your production line? Share your experience below to help other engineers avoid the same traps.


